[su_row][su_column size=”3/5″]
There is often confusion regarding image size on screen and image size when printing and between image size and image resolution. The information given is based on Canon cameras and Photoshop software although the principles are much the same for other cameras and software. Hopefully this article will help your understanding![/su_column]
[su_column size=”2/5″][/su_column][/su_row]
[su_row][su_column size=”3/5″]
Camera Settings
When setting up your camera the objective is to create images which are of the biggest size and the best quality possible. Settings will vary for different cameras but all should allow you to set the image quality. Look for the image size settings within your camera’s menu structure and set it to the highest possible setting. There are two main options:
- RAW files: If your camera supports RAW files then this is the setting which will give you the biggest and best quality image your camera can produce. However, this means that you MUST process the image before it can be used for printing or for screen display.
- JPG files: If you don’t wish to use RAW files the set the image size to Large jpg and the image quality to fine. This will give you the best quality for jpg images.
In an absolute emergency……. read the book!![/su_column]
[su_column size=”2/5″][su_spacer size=”56″]
[/su_column][/su_row]
[su_row][su_column size=”3/5″]
Image Size and Resolution
On a computer screen, width and height are measured in pixels. A pixel, or picture element, is a single coloured dot on your screen. For example a 1200 x 900 image is 1200 pixels wide and 900 pixels high. If you were to view this image on a screen with a resolution of 1920 x 1080 pixels, the image will will appear quite large occupying about 2/3 of the width and about 5/6 of the screen height.
The size of your image when it is printed is usually measured in inches. For example a 6 x 4 landscape (horizontal) print is 6 inches wide and 4 inches high.
Resolution is the term used to describe the number of dots, or pixels, used to display or print an image. Resolution is measured in pixels per inch (ppi) or dots per inch (dpi). The resolution of your image when it arrives on the screen directly from your computer is decided by your camera settings. Assuming you have set your camera for the best quality possible this will typically be in the region of 240 ppi or 300 ppi.
[/su_column]
[su_column size=”2/5″][su_spacer size=”56″]
[/su_column][/su_row]
[su_row][su_column size=”3/5″]
An example
As we’ve seen, a 1200 x 900 image looks pretty big when you view it on your screen – but what happens if we print this image?
Your image has a resolution of 300 ppi which means that each linear inch of your print will contain 300 pixels. This means that the biggest print you can produce with this image is 4 x 3 inches! Can you see how these dimensions were arrived at?
The width was 1200 pixels so at 300 ppi we get a print 4 inches wide (1200 divided by 300).
The height was 900 pixels giving a print which has a height of 3 inches (900 divided by 300).
So why can’t I just change the resolution to 72 ppi and get a bigger print? You can do that and you will get a bigger print but, because you are applying only 72 dots of ink per linear inch, the quality of your image will have plummeted.
Have a look at the table on the right to see the minimum sizes your images will need to be to produce quality prints.
REMEMBER:
- It is ALWAYS best to capture the biggest images your camera is capable of taking.
- Image resolution should be at least 300 ppi if you want to print that image.
- NEVER reduce the size of your original image if you ever intend to print it.
[/su_column]
[su_column size=”2/5″]
Required Image Sizes for Printing
| Print Size (inches) | Image Size (pixels) |
|---|---|
| 6 x 4 | 1800 x 1200 |
| 7 x 5 | 2100 x 1500 |
| 8 x 6 | 2400 x 1800 |
| 10 x 8 | 3000 x 2400 |
| 11.7 x 8.27 (A4) | 3510 x 2481 |
| 12 x 8 | 3600 x 2400 |
| 16 x 12 | 4800 x 3600 |
| 16.53 x 11.69 (A3) | 4959 x 3507 |
[/su_column][/su_row]
[su_row][su_column size=”3/5″]
How to Resize an image (Photoshop CC 2015)
- Load Photoshop
- Open the image you want to resize
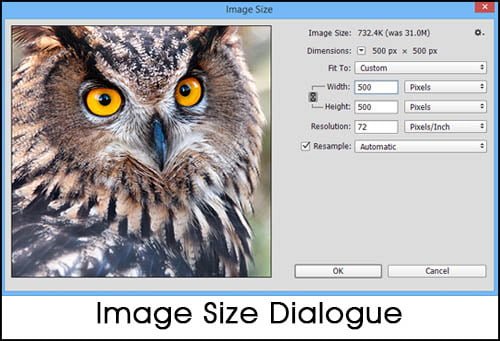
- Click on the Image menu and click Image Size to open the dialogue
- Choose a unit of measurement by clicking the dropdown box to the right of the number
- Make sure that the padlock icon is closed.
- Enter the size you want in the Width box. The height will be adjusted automatically.
- Leave the resolution as it is (see below).
- Click OK and your image will be resized.
- Save the file with a name of your choice.
Resolution
If you wish to change the resolution of an image, you can do this by simply typing in a number on the resolution box. What happens next will depend on whether or not the Resample box is ticked.
- Ticked – the resolution will be changed AND the image will also be resized
- Unticked – the resolution will be changed BUT the image will not be resized
If your image is going to be used on screen only, then it’s a good idea to change the resolution to 72 ppi as this will reduce file size. In this case UNtick the Resample box so the pixel dimensions of your image remain the same.
If you are going to print an image, change the resolution to 300 ppi but, this time, tick the resample box so the image dimensions are resized in line with the resolution.
[/su_column]
[su_column size=”2/5″][su_spacer size=”56″]
[/su_column][/su_row]


