[su_row][su_column size=”3/5″]Many people mention the difficulties they have organising their image files.This article offers one possible approach and is based on a hierarchical folder structure and meaningful file names.
Folder Structure
All files on your computer’s hard drive live in folders. Many people create folders on an ad hoc basis as and when they need them. This will often result in folder chaos as there is no system at work here. Finding a specific file can be a lengthy process and relies on remembering where you stored that file. So… let’s forget about individual files for the moment and think only of how you might choose to organise your photographic content.
All of the following steps can be carried out using Windows Explorer.
[/su_column]
[su_column size=”2/5″] [/su_column][/su_row]
[su_row][su_column size=”3/5″]Choose a location
Identify where on your hard drive or drives you plan to store your image files. Ideally they will all be located together so they will all be accessible in the same area.
Create a root folder
ALL of your image files will be located within this folder. I call my root folder ‘Photography’!
Create Level 1 sub-folders
Create these inside the main Photography folder. Think of the main categories which are descriptive of the kinds of photos you take. The categories I use are:
- Miscellaneous
- Natural World
- People
- Places
- Transfer
As you can see this isn’t exactly rocket science but it will cover pretty well every photo you might want to take. Each of these sub-folders will be broken down further as you will see below.
The Transfer folder is used for a single purpose. When I transfer images from my camera I will always put them all in that folder and sort them out once they’re there.[/su_column]
[su_column size=”2/5″]

File Structure in Windows Explorer – Level 1
[su_row][su_column size=”3/5″]Create Level 2 sub-folders
Take each of these Level 1 folders in turn and create more sub-folders within each of them.
For example, the Level 1 Natural World folder lends itself to a very simple structure within it:
- Fauna
- Flora
- Not Alive
So far none of these folders will contain image files, only sub-folders. Now we move to the level where the actual files will be stored.[/su_column]
[su_column size=”2/5″]
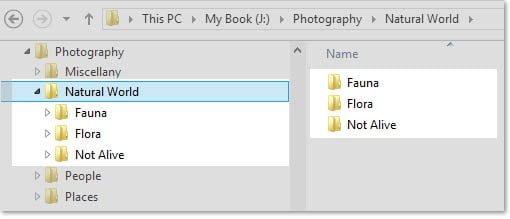
File Structure in Windows Explorer – Level 2
[su_row][su_column size=”3/5″]
Create Level 3 sub-folders
Take each of the Level 2 sub-folders in turn and break them down further. The table on the right contains possible sub-folders for each of the main categories in the Natural World folder. For the purpose of this tutorial let’s assume that this as far as we need to go in terms of sub-folders. This is the level that would actually contain files. However, each of these sub-folders could be broken down further as required. For example, the Birds category could have sub-folders such as Birds of Prey, Garden Birds, Sea Birds, Water Birds and so on. There is no limit to the number of levels you can have in a folder structure.
[/su_column]
[su_column size=”2/5″]
| Fauna | Flora | Not Alive |
|---|---|---|
| Birds | Exotic | Rocks |
| Cats | Fungus | Skies |
| Farm Animals | Garden | Water |
| Minibeasts | House Plants | |
| Various | Trees | |
| Water | Wild Plants | |
| Zoo |
[su_row][su_column size=”3/5″]Create Originals folders
One further refinement is to create a folder called ‘Originals’ inside each and every folder that will contain files. This is where I will put the images which come directly from the camera. Any files which are edited will be saved in the main folder. In this way the original files are never overwritten and can always be reset to their original state. For example imagine I have edited a file called ‘Bluebell01’ from the Originals folder which is within the Wild Plants folder. After I have edited this I will save it in the Wild Plants folder and NOT in the Originals folder.
And that’s really all there is to it! No need to remember where your images are. If your structure is based on a simple logic you will always be able to find where any image is. What I’ve described here isn’t a right answer. It’s an answer which makes sense to me. You might choose a different system and that’s absolutely fine so long as it’s a system you’ve thought through and which will work for you.[/su_column]
[su_column size=”2/5″]

File Structure in Windows Explorer – Level 3
[su_row][su_column size=”3/5″]
Organising your images
When you transfer your images from your camera to computer they usually arrive as a mixture of different content with unintelligible names like img_2435. I would suggest the following workflow:
- Transfer the photos from your camera to the Transfer folder.
- Delete any which are no hopers or duplicates.
- Rename your photos with meaningful names.
- Move your images from the Transfer folder to the appropriate Originals folders.
You can also use the same procedure to sort out files which are already on your computer.
Renaming
This can be a laborious task. Many software applications like Adobe Bridge or Lightroom offer a ‘bulk renaming’ facility where you can rename a whole batch of files in one go. There are also many free software utilities which will carry out the same task. Typically you choose a base filename and all files would be renamed to that with a numeric index added at the end. For example if you have 32 pictures of bluebells the base name could be Bluebell and a numeric index would be added automatically resulting in a set of files called Bluebell001, Bluebell002, Bluebell003 etc.
Some files are tricky!
Often you will have a dilemma deciding where to put a file as it can have more than one possible location. An example of this might be photographs of some flowers you took on holiday. Do you file them in the folder with all your other photos from that holiday or do you put them in a folder of flower pictures? There’s no right answer to this and you will have to decide whether it’s more important to keep your holiday photos together or whether you want your flower pictures together.
One solution is to use keywords using software like Lightroom or Adobe Bridge. This allows you to tag a photo with one or more keywords. Then you can display in one window all photos with the same keyword or kewywords regardless of where they are physically stored on your drive. This can become a very complex and time-consuming task so you will need to decide whether it’s important enough to do this based on how you want to display your images.
[/su_column]
[su_column size=”2/5″]Content[/su_column][/su_row]
[su_row][su_column size=”3/5″]
Backup
Having gone to all the trouble of taking your photos and organising them on your hard drive, it’s imperative that you also have a system for backup. This will involved creating a duplicate of your folder system and files on a completely separate device such as an external hard drive. You can also use the Cloud to backup your images if you have sufficient cloud space and a good Internet connection. There are several ways to backup:
- use ‘mirrored drives’. Two drives are used and one drive will automatically ‘mirror’ the contents of the other. This is an excellent solution!
- use backup software. This can automate the process of backing up and it will synchronise files on your main drive and backup drives.
- backup manually. This works too but is time-consuming and requires discipline as you need to remember to backup regularly. It’s the least good solution!
If you’re really paranoid, you can use all 3 approaches! 🙂
[/su_column]
[su_column size=”2/5″]Content[/su_column][/su_row]