This tutorial is based on Elements 14, the current release at the time of writing (November 2015). Earlier versions may or may not have all the facilities described here.
[su_row]
[su_column size=”1/3″]
Opening the RAW image file
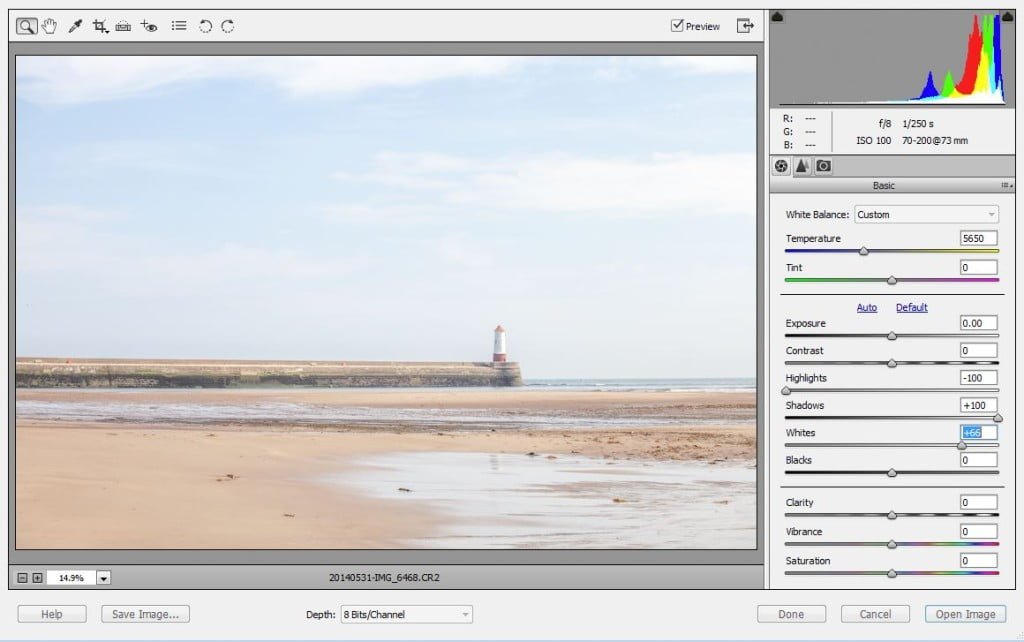
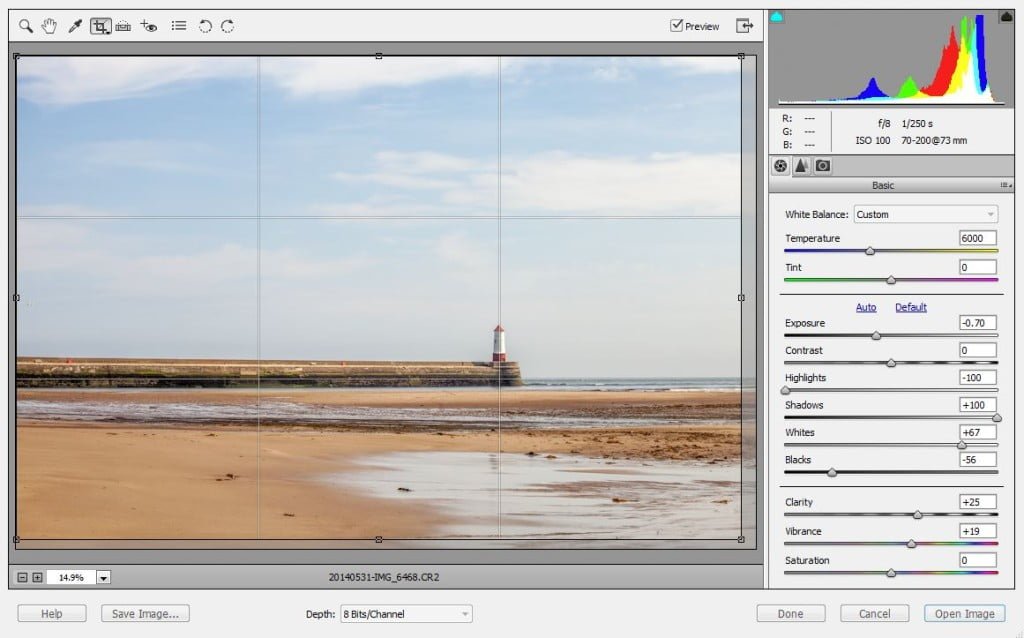
As ever we are assuming you have taken the photograph using RAW in your camera. You can try these techniques on JPEG files but you may be unhappy with the results. So, start Elements and select File-Open. Choose the RAW file you want to work on. Elements will automatically load the file into a version of Adobe’s Camera RAW. This contains very similar functionality to the RAW processing in full Photoshop and Lightroom.
If you look at the histogram on the right, you’ll see most of the information is over to the right of the chart. This is a reflection of the fairly bright image we’ll be working on, and is a good start point. Much darker images will provide somewhat fewer opportunities for creating a noise-free output.
[/su_column]
[su_column size=”2/3″]
[/su_column]
[/su_row]
[su_row]
[su_column size=”1/3″]
Recover the highlights
We now make some adjustments to the image, mainly to assess how much detail we have to play with. The first thing to do is recover the detail from the highlights by reducing them as much as possible.
We may come back to them later on but for the time being move the slider to -100. You’ll immediately see a difference to the amount of detail in the sky for example.
[/su_column]
[su_column size=”2/3″]
[/su_column]
[/su_row]
[su_row]
[su_column size=”1/3″]
Open up the shadows
We also lighten all the shadow areas to open up the detail they hold. Move the slider over to +100. You’ll see the stonework in the quay lighten considerably as a result.[/su_column]
[su_column size=”2/3″]
[/su_column]
[/su_row]
[su_row]
[su_column size=”1/3″]
Boost the whites
We need to return the white tones to a proper bright white. Hold the ALT key down (CMD on a Mac) while at the same time moving the Whites slider over to the right. As the white tones progressively “blow out” you’ll see more small areas of colour appear on the image. The point to stop moving the slider is when there are only a very few points of colour showing. Its not unusual for a picture to have small areas of intense white with no detail in them. If you have included very bright light sources in your picture, you can ignore those areas while doing this. There is no right answer to this action -you have to make a judgement call based on what the image looks like.
[/su_column]
[su_column size=”2/3″]
[/su_column]
[/su_row]
[su_row]
[su_column size=”1/3″]
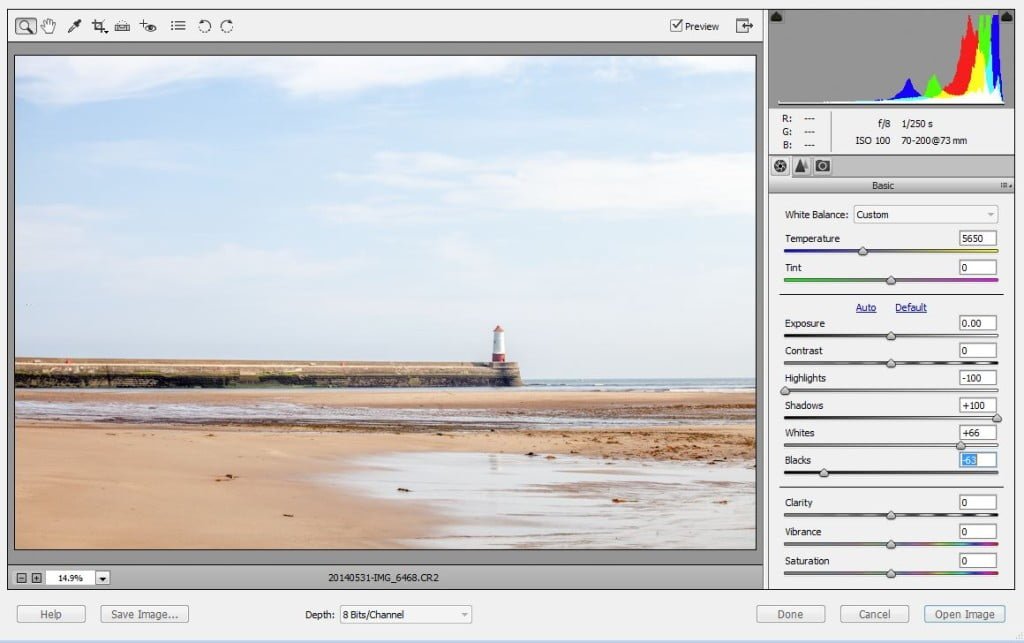
Darken the blacks
Now to make the black tones properly black. Again with the ALT key down, move the Blacks slider over to the left until small areas of colour appear which represent parts of the picture which will be completely black with no detail in them. Depending on the content of your picture, stop moving the slider when you have just enough black tones for your purpose. Again, its a judgement call.
[/su_column]
[su_column size=”2/3″]
[/su_column]
[/su_row]
[su_row]
[su_column size=”1/3″]
Increase the clarity
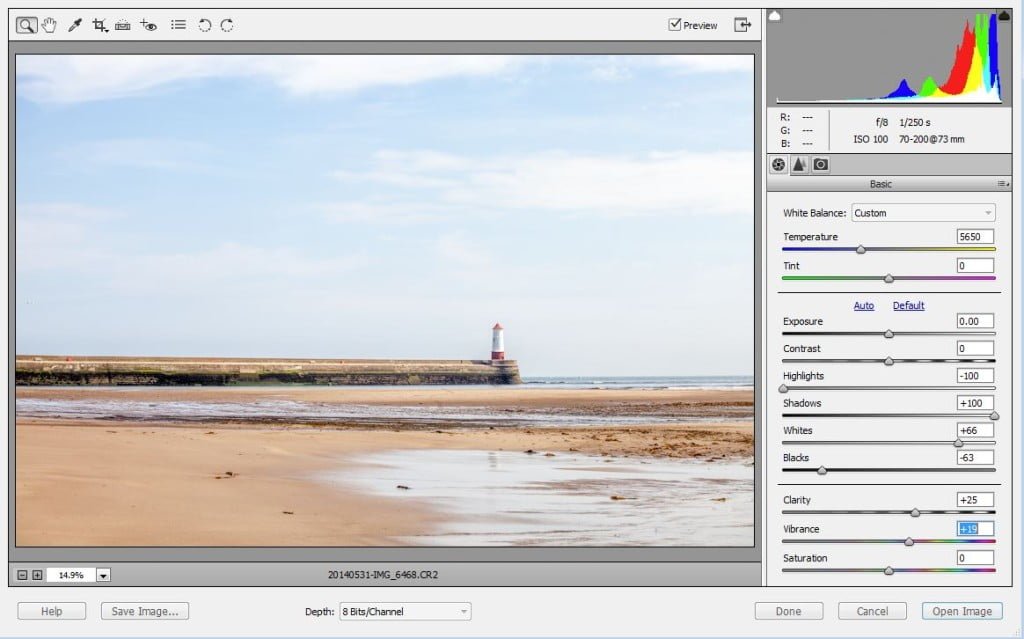
Typically you will probably need to increase the contrast at least a little bit in your image. A good way to do this is to increase the Clarity in the image. This increases the contrast in the mid tones in the image and is a little more subtle than using the Contrast slider. A little movement of the Clarity slider goes a long way and a good place to start would be around +12 or so, but it depends on the picture. Here I ended up at +25 which felt about right. Overdoing Clarity can lead to haloes around objects and, in darker pictures, excessive noise which is rarely a good thing!
[/su_column]
[su_column size=”2/3″]C
[/su_column]
[/su_row]
[su_row]
[su_column size=”1/3″]
Increase the vibrance
In this image, I chose to boost the Vibrance a little bit. Vibrance is a way increasing the saturation of the colours in a picture but only for those colours which are not already well represented in the image. The changes made by the Vibrance slider are often fairly subtle.
[/su_column]
[su_column size=”2/3″]
[/su_column]
[/su_row]
[su_row]
[su_column size=”1/3″]
Reduce the exposure
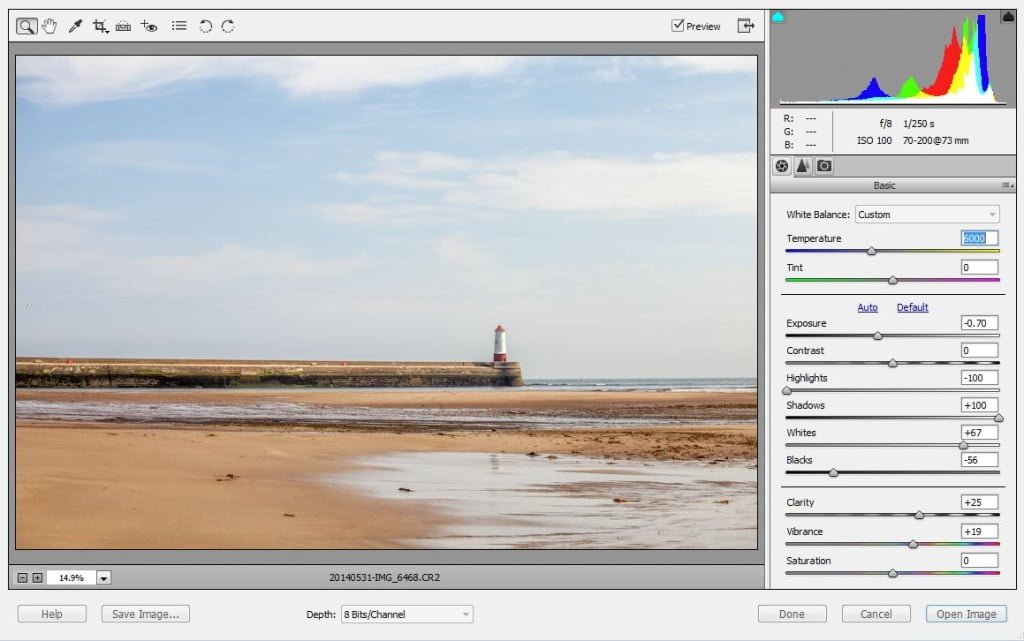
After all these changes, the picture still appears a little light overall so to darken the whole scene just move the exposure slider slightly to the left. In this case -0.7 gives a better feel. Its better to leave the exposure adjustment until quite late in this process so you can assess exactly how the image is shaping up.
[/su_column]
[su_column size=”2/3″]
[/su_column]
[/su_row]
[su_row]
[su_column size=”1/3″]
Adjust temperature to reduce blue cast
Often when there is a bright sky, there can be quite a lot of blue light around. This image is an example of that. Snowy scenes can also have a lot of blue to deal with. Increasing the exposure compensation when taking the picture can go some way towards dealing with it. In Camera RAW we can adjust the temperature of the image after the event very simply. Simple move the Teperature slider over towards the right (yellow) a little bit. It will be obvious when you have gone too far. The result of increasing the temperature in this image is to make the sand banks less harsh and bit more, well, sandy.
[/su_column]
[su_column size=”2/3″]
[/su_column]
[/su_row]
[su_row]
[su_column size=”1/3″]
Crop for size and composition
Finally with this image, we need to consider the proportions and the detailed composition. Since the pier is a very graphic element with strong lines across the image, I chose to place the lighthouse exactly on a “thirds” line, and the pier along another “thirds” line. You can do this by cropping the image very slightly and watching just how the grid lines up on the picture elements. This doesn’t have to be done precisely; just getting the elements close to where we want them is enough.
[/su_column]
[su_column size=”2/3″]
[/su_column]
[/su_row]
Selective adjustments
The version of Camera RAW supplier with Elements has, as you would expect, a restricted set of features compared with Lightroom. Any further adjustments to our image have to be made in Elements itself. Just click on the “Open Image” button to open the file in Elements.
[su_row]
[su_column size=”1/3″]
Open in Elements and create new layer
For this image, we will make some adjustments to the sky to bring out more detail in the clouds without affecting anything else in the picture. We need to find a way of darkening the sky without making the beach areas any darker.
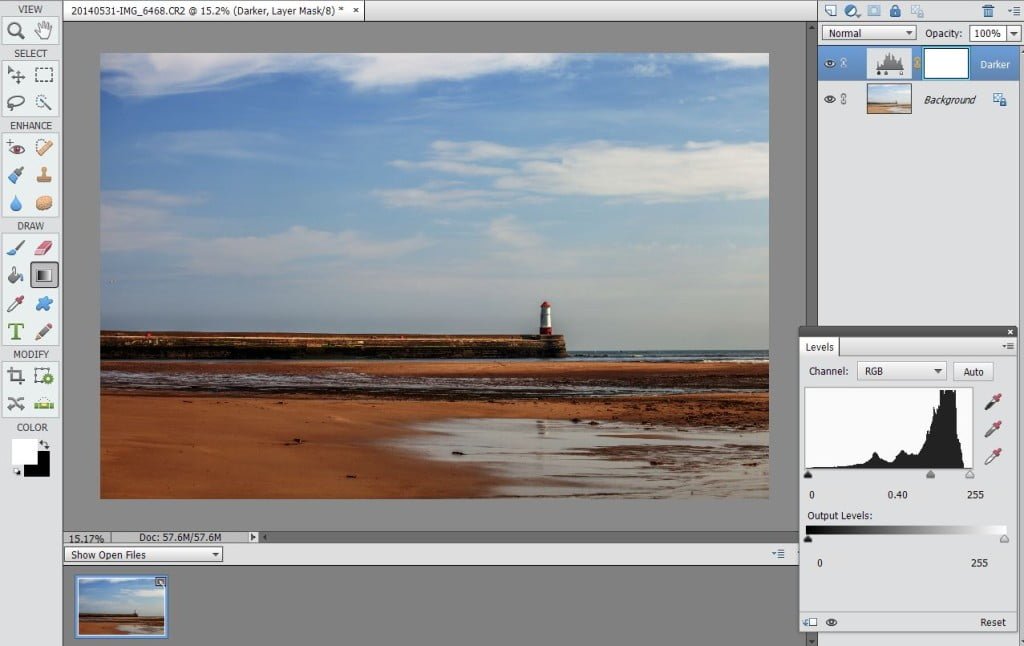
For this we create a new Adjustment Layer by choosing Layer – New Adjustment Layer – Levels from the menu. Its a good idea to give each new layer a name in the dialog box so you can remind yourself what each one does. In this case, we called it “Darker” for reasons that will become apparent.[/su_column]
[su_column size=”2/3″]
[/su_column]
[/su_row]
[su_row]
[su_column size=”1/3″]
Darken the midtones
And here’s the reason! Click on the Darker layer over on the right in the Layers palette. When its highlighted, changes you make to the Levels dialog only affect that one layer. We need to make a change to the mid tones of the image so that the sky looks the way we want it in the finished picture. In the previous picture above in the middle of the Levels chart there’s a grey triangle along the bottom axis just above the number 0.70; we just want to move that triangle over to the right a bit (in this case until it reads 0.40). You’ll know when you’ve moved it enough when the sky gets to be the colour you’re looking for. You can ignore the effect this slider has on the sand banks for now; just get the sky looking right.
[/su_column]
[su_column size=”2/3″]
[/su_column]
[/su_row]
[su_row]
[su_column size=”1/3″]
Apply the gradient tool
The last step is to hide the darkened sand banks from the final image; we just want the dark sky and the original light sand. We need to mask the change. Make sure the Darken layer is highlighted then click on the Gradient tool
Now check that the colour selector shows both white and black, and that white is the foreground colour.
Then select the Foreground to Background gradient, and the Linear Gradient.
Finally draw a gradient line down across the image. You can experiment by dragging a line from top to bottom for a very gradual gradient, or a short line across the pier for a sharp transition from darker to lighter. Remember to select Edit-Undo after each experiment (or CTRL-Z) otherwise you will be layering each additional gradient one of top of the other.
You are aiming to get the sky as dark as you wish and for the sand to stay relatively light.
[/su_column]
[su_column size=”2/3″]
[/su_column]
[/su_row]
[su_row]
[su_column size=”1/3″]
Apply sharpening
Last of all for this image we’ll sharpen it a little bit immediately before saving for printing. Techniques and preferences for sharpening appear to be very individual. Suffice to say I start off setting the amount to 50 and leaving the Radius and Threshhold as low as they’ll go and take it from there. Now we’re good to go!
Sharpening will be covered in more detail in a future tutorial.
[/su_column]
[su_column size=”2/3″]
[/su_column]
[/su_row]


